What is Ionic?
Ionic is an open-source UI toolkit for building web applications.
The strength of Ionic lies in its ability not only to facilitate the intuitive development of a web application but also to offer the possibility of presenting the same application as a mobile app for iOS and Android. This allows us to leverage the power of cross-platform development, saving both code and development time.
As a toolkit, Ionic provides many building blocks, also known as UI components, for the rapid development of a UI design tailored for both the web and mobile apps. The focus here is on the front end, especially user interactions.
Ionic supports Angular as well as React and Vue as development platforms. In this context, we initially focus on Angular and demonstrate the development process in Ionic using a small example.


What is Angular?
Example: Grocery List App
Let’s say we want to develop a simple app that helps with creating grocery lists. We have three requirements:
- The current shopping list should always be displayed.
- New items should be added through a menu with a button click.
- As soon as an item is added, the shopping list should update immediately.
With the UI components, both the list and the menu button in the footer can be easily implemented. For starters, the list will be filled with placeholders.
Now, for each list item: to have a clear shopping list, each item needs at least a name, a quantity, and a unique ID.
However, if the Homepage component handles both displaying the shopping list and the data processing for list items, the code quickly becomes cluttered.
This is where services come into play. With an ItemService, we can separately define from the Homepage which attributes constitute an item and how the values of the items are set.
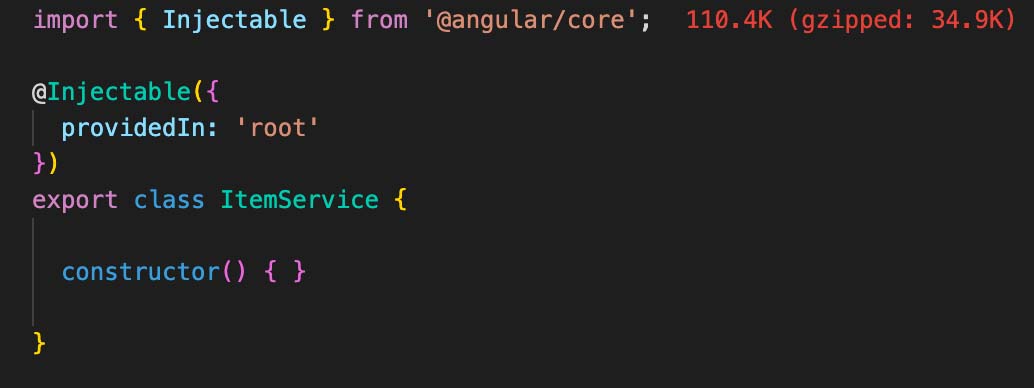
To create such a service, we need the command:ng generate service item
This command generates the following class for us:


This service is now well-suited to define a structure for the shopping list items, create items, and then return them to the Homepage after processing.
To easily access the service, another strength of Angular is utilized: Dependency Injection. Since the ItemService is annotated with the @Injectable decorator, we can easily inject it into any other components. For use in the Homepage component, the service just needs to be added to its constructor:
import { Component } from '@angular/core';
import { ItemService } from './item.service';
({
selector: 'app-home',
templateUrl: 'home.page.html',
styleUrls: ['home.page.scss'],
})
export class HomePage {
constructor(private itemService: ItemService) {
// Access the ItemService methods here
}
}
With this setup, the HomePage component can now easily access the methods provided by the ItemService for managing shopping list items. The separation of concerns allows for cleaner and more maintainable code.

We now have a web application – what’s next?
We have a web application – what’s next?
In the initial steps, we’ve become familiar with Ionic and Angular, and with their help, we’ve built a web application.
Now, Capacitor comes into play to enable building for mobile platforms as well.
In Ionic, Capacitor allows the creation of new target folders for both iOS and Android in the project. Here, all necessary files are generated, allowing us to later open our app as a project in the respective native IDEs (Android Studio or Xcode).
To create the folder containing all the relevant files for iOS, a simple command is needed:
ionic capacitor add ios
To further edit the native code and create a build, you only need the following command:
ionic capacitor open ios
If we later make changes to the web code, we don’t need to discard and recreate this target folder. Instead, we can simply copy the updated code into the folder using:
ionic capacitor copy ios
From here, a build can be created in Xcode and tested on either a simulator or a device.
If additional functionalities are desired that are only available for native devices, Capacitor provides APIs that enable a “web-like” use of native features. The primary communication between the web part and the native part is done through plugins. In Capacitor, there are three types of plugins:
- Official Capacitor Plugins (App, Device, Haptics, etc.)
- Capacitor Community Plugins
- Self-written plugins
And there you have a nice little “Grocery List” app where a list can be updated with a button click. The app has been developed for the web, but it can also be offered on iOS and Android.


About the Author
Vanessa
After completing her master's degree in Media Informatics and Applied Computer Science, Vanessa joined us as a web developer, bringing her expertise in Virtual Reality. Since then, she has contributed to numerous native-hybrid projects. Warning: You might find her stories nearly finished even before the sprint begins 😉
Frequently ask questions:
What is Ionic and how is it used?
Ionic is an open-source UI toolkit for developing cross-platform web applications and mobile apps for iOS and Android. It provides pre-built UI components for rapid development.
How is a web application extended to mobile platforms?
With Capacitor, builds can be created for iOS and Android. Ionic simplifies this process by automatically generating native applications.
Which development platforms does Ionic support?
Ionic supports Angular, React, and Vue as development platforms. In the example, Angular is used to demonstrate the development process.
What are the core concepts of Angular in conjunction with Ionic?
Angular enables component-based development of web applications. It utilizes services for data manipulation and exchanging information between classes.
What types of plugins are available in Capacitor?
Capacitor offers official, community, and custom plugins that allow the integration of native features into web applications. These plugins can streamline development for mobile platforms.


